

I found this tatting chart on my journey through pinterest. It struck me as a simple edging that could be used for a variety of projects. I would probably use this to highlight the arms of a knitted garment as it is quite complex and would match a knit very well. I feel the design is a little too heavy for a light object such as a handkerchief.
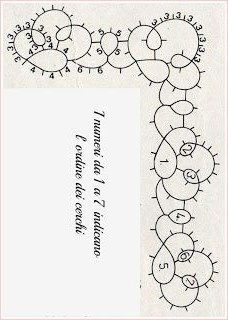
I wrote down a pattern from the chart in case anyone prefers reading their projects through. I would reccomend this edging if your looking for something to accent a heavy garment or household covering.
I hope you give this a go and please visit the designer’s blog here.She seemed to have more patterns. Stay Awesome
Large R: 4ds, p, 4ds, p, 4ds, p, 4ds, p, 4ds, p, 4ds RW
Ch: (A)3ds, p, 3ds, p, 3ds, p, 3ds, p, 3ds. RW
R (A*): 3ds, p, 3ds, J to last P on large ring, 3ds, p, 3ds. RW ++
Ch: 3ds, p, 3ds, p, 3ds, p, 3ds, p, 3ds, p, 3ds, p, 3ds. RW
R: As for A* join to next picot on large ring. RW
Ch: As for A join to next picot on large ring. RW
Ch (B): 6ds, p, 6ds. RW
R: 5ds, join to 2nd picot on last chain A, 5ds, p, 5ds, p, 5ds. RW
Ch: As for B. RW
R: As for Large Ring. RW
Ch: 3ds, p, 3ds, join to picot on middle ring, 3ds, p, 3ds, p, 3ds. RW
(At this point if you want to continue straight across you need to repeat the above from ++) Written below is the instructions for the turn.
R: A*
Ch: 3ds, p, 3ds, p, 3ds, p, 3ds, p, 3ds, p, 3ds, p, 3ds, p, 3ds.
R: As for A* join to next picot on large ring.
Ch: As for A join to next picot on large ring. RW
Ch (B): 6ds, p, 6ds. RW
R: 5ds, join to 2nd picot on last chain A, 5ds, p, 5ds, p, 5ds. RW
Ch: As for B. RW
Repeat 🙂

Charming edging! 😉
LikeLike